Wednesday, December 9, 2015

Tutorial : Blockquote and Border


Hi! Tutorial for today is Blockquote. Ape tu blockquote ?? Tengok kat bawah ni ::

Hai
Biasanya orang guna blockquote ni untuk buat tutorial atau ape2 je lah :)
Boleh je tulis ape2 yang korang nak kat dalam blockquote tu :)
JOM TRY!!!

1. TEMPLATE > Edit HTML

2. Search for this code 

 .post-body {
3. Jumpe tak ?? Kalau jumpe Copy code kod ni

.post blockquote { background-image:url(URL BACKGROUND); KOD BORDER
border-radius: 1em 4em 1em 4em;   padding: 6px; Border: 1px solid #000000; margin:1em 20px; }

 4. Paste kan kod ni kat BAWAH kod yang kOrang dah cari tadi 

5. Save dan tengok hasilnye :)

1 : URL BAGROUND YANG KORANG NAK

2 : JENIS BENTUK BORDER YANG KORANG NAK (ADE KAT BAWAH)

3 : KETEBALAN BORDER

4 : BOLEH PILIH SAME ADE NAK solid / dashed / dotted

5 : COLOR SEKELILING BORDER

 JENIS-JENIS BENTUK BORDER
 
-moz-border-radius-bottomright: 50px;
border-bottom-right-radius: 50px;
}
  
-moz-border-radius-bottomright: 50px 25px; border-bottom-right-radius: 50px 25px;
}


-moz-border-radius-bottomright: 25px 50px;
border-bottom-right-radius: 25px 50px;
}
-moz-border-radius: 1em 4em 1em 4em;
border-radius: 1em 4em 1em 4em;
}
-moz-border-radius: 25px 10px / 10px 25px;
border-radius: 25px 10px / 10px 25px;
}

-moz-border-radius: 35px;
border-radius: 35px;
}

Cara nak gune BLOCKQUOTE


 KALAU TAK JADI... SORI YE :)

BYE.



Tuesday, December 8, 2015

GIVEAWAY HUJUNG TAHUN 2015 NS


HADIAH
[]
4 x Diari Planner Tahun 2016
3 x Hadiah Saguhati

TARIKH BERLANGSUNG :
5 DIS 2015 hingga 20 DIS 2015

KLIK BANNER SEKARANG UNTUK MENYERTAI..!!! 
TERIMA KASIH KAWAN-KAWAN..

GiveAway Akhir Tahun 2015 Sheila Inspire

بِسْـــــــــمِ ﷲِالرَّحْمَنِ الرَّحِيم

Give Away Akhir Tahun 2015 Sheila Inspire


Allah Ya Rahman, Ya Rahim, Ya Razzaq, Dia Yang Maha Pengasih dan Penyayang serta Yang Maha Memberi Rezeki, dengan ini saya ingin melancarkan "Giveaway Akhir Tahun 2015 Sheila Inspire".... sempena template baharu ini dan keluarga besar blooger yang sering berkunjung ke blog yang tak seberapa ini.... semoga ukhwah kita sentiasa terjalin,,, tegur-tegur la diri ini. Adakala tak berapa nak aktif kerana kesibukan tugasan.... Akhir sekali, saya harap dengan GA yang tak seberapa ini dapat menjalinkan hubungan kita sesama blogger.... Maaf yer gambar hadiah tidak clear....

Syarat:
1. Buat entry masukkan banner dan link ke segmen ini.
2. Kalau sudi boleh follow : Sheila Inspire, add Facebook, add Twitter, friend Google, follow Instagram (kalau tak nak pun tak apa)... terpulang....
3. Jangan lupa tinggalkan link di petak komen.

Tarikh akhir : 29 Dis 2015 jam 11.59 pm

Hadiah

3 x (2 orang) (hadiah misteri)


1 x (1 orang) planner 2016


1 x (1 orang) diary 2016


3 x (3 orang) shawl H&M


1 x (1 orang) face tower + vase


1 x (1 orang) botol air


1 x (1 orang) beg mickey mouse


3 x (3 orang) pamplet set zikir Asmaul Husna


Setakat ini 12 peserta bertuah dicari dan mungkin akan bertambah dengan kasih sayang Ya Rahman, Ya Rahim, Ya Razzaq.... Keputusan akan ditentukan secara cabutan bertuah pada 31 Dis 2015 InsyaaAllah, Allah Ya Baari'....


Senarai Peserta


Tutorial : Cursor Hover


 Hi! Tutorial harini name nye cursor hover. Cursor hover tu, bila orang sentuh mane-mane link dekat dalam blog , Cursor berubah menjadi cursor lain :)
JOM TRY

 PERHATIAN !!!!!!!
 UNTUK TUTORIAL NI KORANG KENE ADE CURSOR DULU!!! TUTORIAL CURSOR >  SINI

1. LAYOUT > Add Gadget > Click HTML/Javascript

2. Copy cod kat bawah nie

<style type="text/css">body, a, a:link{cursor:url(URL CURSOR 1), default;} a:hover {cursor:url(URL CURSOR 2),wait;}</style>


MERAH : Cursor yang korang pakaikan kat log korang

PINK : Cursor hover korang

3. Paste kan kat dalam ruangan HTML tadi.

4. Save dan dah siap :)

// kalau tak paham , komen ok!


Tutorial : Scroll To Top Button


Hi! Harini nak ajar camne nak buat Sroll To Top Button. Ape bende tu? Cuba korang tengok kat tepi blog Dania.. >>>> Kalau korang tekan je button tu nanti die naik atas dengan sendirinye! Jom try ;)

1. LAYOUT > Add Gadget > Click HTML/Javascript

2. Paste kan kod kat bawah di ruangan HTML tu

<script type="text/javascript" src="http://ajax.googleapis.com/ajax/libs/jquery/1.3.2/jquery.min.js"></script><script type="text/javascript" >/***********************************************
* Scroll To Top Control script- &#169; Dynamic Drive DHTML code library(www.dynamicdrive.com)* Modified byDaniaNasreen***********************************************/var scrolltotop={
setting: {startline:100, scrollto: 0, scrollduration:1000, fadeduration:[500, 100]},
controlHTML: '<img src="URL Top Button" />',
controlattrs: {offsetx:5, offsety:5},
anchorkeyword: '#top',
state: {isvisible:false, shouldvisible:false},
scrollup:function(){
if (!this.cssfixedsupport)
this.$control.css({opacity:0})
var dest=isNaN(this.setting.scrollto)? this.setting.scrollto : parseInt(this.setting.scrollto)
if (typeof dest=="string" && jQuery('#'+dest).length==1)
dest=jQuery('#'+dest).offset().top
else
dest=0
this.$body.animate({scrollTop: dest}, this.setting.scrollduration);
},
keepfixed:function(){
var $window=jQuery(window)
var controlx=$window.scrollLeft() + $window.width() - this.$control.width() - this.controlattrs.offsetx
var controly=$window.scrollTop() + $window.height() - this.$control.height() - this.controlattrs.offsety
this.$control.css({left:controlx+'px', top:controly+'px'})
},
togglecontrol:function(){
var scrolltop=jQuery(window).scrollTop()
if (!this.cssfixedsupport)
this.keepfixed()
this.state.shouldvisible=(scrolltop>=this.setting.startline)? true : false
if (this.state.shouldvisible && !this.state.isvisible){
this.$control.stop().animate({opacity:1}, this.setting.fadeduration[0])
this.state.isvisible=true
}
else if (this.state.shouldvisible==false && this.state.isvisible){
this.$control.stop().animate({opacity:0}, this.setting.fadeduration[1])
this.state.isvisible=false
}
},
init:function(){
jQuery(document).ready(function($){
var mainobj=scrolltotop
var iebrws=document.all
mainobj.cssfixedsupport=!iebrws || iebrws && document.compatMode=="CSS1Compat" && window.XMLHttpRequest
mainobj.$body=(window.opera)? (document.compatMode=="CSS1Compat"? $('html') : $('body')) : $('html,body')
mainobj.$control=$('<div id="topcontrol">'+mainobj.controlHTML+'</div>')
.css({position:mainobj.cssfixedsupport? 'fixed' : 'absolute', bottom:mainobj.controlattrs.offsety, right:mainobj.controlattrs.offsetx, opacity:0, cursor:'pointer'})
.attr({title:'Scroll Back to Top'})
.click(function(){mainobj.scrollup(); return false})
.appendTo('body')
if (document.all && !window.XMLHttpRequest && mainobj.$control.text()!='')
mainobj.$control.css({width:mainobj.$control.width()})
mainobj.togglecontrol()
$('a[href="' + mainobj.anchorkeyword +'"]').click(function(){
mainobj.scrollup()
return false
})
$(window).bind('scroll resize', function(e){
mainobj.togglecontrol()
})
})
}
}

 MERAH : Tukar dengan top button yang korang nak


3. Dah Siap!! Save dan preview dulu jadi ke tak... kalau tak jadi tu sorry lah ye.. saye tak tahu nak buat ape ;) Kalau tak paham boleh komen kat bawah ok!

Monday, December 7, 2015

Tutorial : Cantikkan Post Tittle


Hi! Nak cantikkan post title macam saye punye??


Senang je.. ikut step ni ye

1. TEMPLATE > Edit HTML

2. Search for this code

h3.post-title, .comments h4 {

3. Maybe akan ade kod-kod lain bawah dia.

4. Copy kod ni

border:1px dashed #000000;
background:url("URL BACKGROUND");
}
MERAH : boleh pilih same ade nak dashed / solid / dotted
PINK : Warna untuk border
BIRU : URL background yang korang pilih

5. Paste kan kat bawah semua kod yang saye tunjuk kat dlm gambar tadi.

6. So, it will look like this

*dlm tu saye dah siap tukar background 

7. Click SAVE and DONE.

tak paham?? Just comment :3


How Do I Get Soft Lip ?


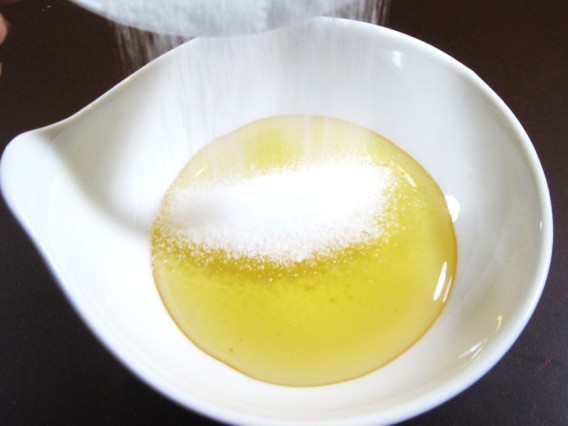
So for today beauty tips, im gonna share with you how to make your lips soft Naturally. It really easy and i have try it at home. It  also help to removing dead skin cells.

What you gonna do is you just need :

1 tablespoon of Honey
1 tablespoon of Sugar

Just mix them together and put it on your lips for 10-15 minutes and wash them after you done. Repeat it once a week .


Bye .

Tutorial : Rainbow Link


Hi ! Today tutorial is Rainbow Link! What is rainbow link ? Kalau korang sentuh mane2 link with your cursor, nanti link tu akan bertukar menjadi warna rainbow ! Nak try??

1. LAYOUT > Add Gadget > Click HTML/Javascript 

2.  Copy Kod ni dulu

 <script src="http://fwzynn.googlepages.com/rainbow.user.js" type="text/javascript">
    /***********************************************
    * Script edited by Ynn Ainul at http://fwzynn.blogspot.com/
    * Please keep this notice intact
    ***********************************************/</script>

3 . Dah?? Paste kod tu kat ruangan HTML tadi :)

Done ! But first you need to preview dulu.

Tak paham?? Komen kat bawah 

Tutorial : Satu Page , Satu Post


Hi ! New tutorial . Ramai orang tanye saye macam mane nak buat satu page ade 1/2/3/4/.... post tu? Senang je!

1 . Go to SETTINGS . Deka setting ade tulis Post and Comment kan? Klik kat situ

2.  Nanti kat post ade nampak macam ni :


 3. So tukar nombor dua tu kepada nombor post yang ade pade setiap page macam yang korang nak (tak semestinya satu je) ! Senang je kan! Then Save !  siap 

Kalau tak paham jugak ... komen kat bawah nih... BYE

Tutorial : Cursor For Blog


Hi ! So , today saye nak ajar care nak tukar cursor ! Cursor tu ape? cursor tu macam kat sebelah tu lah


 Cara 1 :

 1. Go to this link : http://www.cursors-4u.com/

 2. Carilah ape2 cursor yang korang suke pun .

 3. Copy link cursor tu.

 4. Go to LAYOUT > Add Gadget > tekan HTML/Javascript

 5. Paste link cursor. Save and preview dulu :)


Cara 2 :

1. Go to LAYOUT > Add Gadget > tekan HTML/Javascript

2. Copy code ni

<style>body {cursor:url(LINK CURSOR), url(LINK CURSOR), auto;} </style>
<a href="LINK BLOG" target=_blank><div style="height: 50px; width: 50px; position: absolute; top: 0px; left: 0px;"> </div></a>

 #LINK CURSOR : Link Cursor yang korang nak

 #LINK BLOG : Link blog korang

3. Paste kan code dalam ruangan HTML tadi . Save and Done!!

Cursor yang saye jumpe ! (bukan saye punye. banyak lagi dekat blog : http://nurulatiqahjaidin.blogspot.com . Semua cantik2)

http://free-themes.info/cursor/mustache/pinkmustache.png

  
http://free-themes.info/cursor/mustache/mustache2.png

http://free-themes.info/cursor/mustache/mustache.png

 
http://free-themes.info/cursor/mustache/bluishmustache.png